Exclusive to OnDemand5.com and ShopKey5.com, the Live Tips system allows users to view and share real world tips alongside existing OEM information. The unique combination of both sources of information leads you to the specific information you need to fix the vehicle faster. Mitchell 1 is conducting this tip contest for a limited time in order to encourage and reward technicians who actively participate in the tip system. See the help system in OnDemand5.com or ShopKey5.com for information on the Live Tips system. Please read the following contest rules carefully. Thank you for participating. If you have questions or comments about the tip contest, please send them to .

|
TIP CONTEST WINNERS FOR DECEMBER 2011
|
2001 Jeep Cherokee Sport - READ BEFORE TPS DIAGNOSIS/PCM REPLACEMENT by DFreeman616 at Quality Express R and S Auto
As weird as this sounds, I had a bad clockspring cause a P0123 TPS High Voltage on an 01 Cherokee. Followed full diagnostic for TPS, including backprobing TPS signal at PCM, which varied within range and never above 4.5 volts, yet the PCM alway reads 4.98v while the Trans Module showed proper voltage. Also had no horn and Driver Airbag Deployment loop open. Unplugged clockspring and TPS voltage showed normal on scan tool, replaced clockspring and no problems anymore.
==========
Tip: read before TPS diagnosis/PCM replacement
Vehicle: 2001 Jeep Cherokee Sport
Category/Subcategory: * Wiring Diagrams-All / Wiring Diagrams
Title/Heading: SYSTEM WIRING DIAGRAMS / 4.0L
Posted By: DFreeman616
Shop: QUALITY EXPRESS R AND S AUTO
Date: 12/4/2011
2005 Chevrolet TrailBlazer - MULTIPLE COMMUNICATION CODES by CruisinMiles at Cruisin Auto Repair
Customer stated all dash lights where coming on and door locks would quit working. A system scan showed comm codes in every module except for lift gate module that had no memory codes at all. Noticed rear defog and rear wiper were inoperative and a quick check in the lift gate hinge revealed a broken LT BLUE class 2 wire and BLACK ground that would intermittently touch pulling data line down.
==========
Tip: Multiple Communication codes
Vehicle: 2005 Chevrolet TrailBlazer
Category/Subcategory: * Wiring Diagrams-All / Wiring Diagrams
Title/Heading: SYSTEM WIRING DIAGRAMS / COMPUTER DATA LINES
Posted By: CruisinMiles
Shop: CRUISIN AUTO REPAIR
Date: 12/7/2011
2000 Toyota Camry Solara - EGR POSITION SENSOR FAILURE by herb at Amato Tire and Service
Hook a voltmeter, or o-scope, or graphing meter up to the egr position sensor signal wire. Key on engine off(koeo) voltage is between .5 volts - 1.0volt. Apply vacuum to egr valve with vacuum hand pump slowly in small increments while observing voltage reading. The voltage should increase with vacuum. With slow vacuum apply usually around 3inches of vacuum a bad sensor will drop to zero volts, apply a little more vacuum(5 inches) and the voltage will jump up to 1.5v-2.5v which is normal. When vacuum is applied slowly and consistently, the voltage sweep should be smooth with no drop outs from .5v-5.0v. On the failing sensors they tend to drop out to zero volts at around 3-5 inches of vacuum. This will cause the ecu to stop commanding egr flow and set the light. 3-5 Inches of vacuum is the sweet spot of normal egr function during typical driving scenarios, so its no mystery as to why the egr position sensor contacts wear and fail at this position.
==========
Tip: egr position sensor failure
Vehicle: 2000 Toyota Camry Solara SE
Category/Subcategory: Engine Performance / Testing & Diagnostics
Title/Heading: ENGINE CONTROL SYSTEM SELF-DIAGNOSTICS - V6 / Diagnosis & Repair
Posted By: herb @amato tire and service
Shop: AMATO TIRE
Date: 12/17/2011
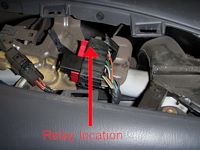
2004 Ford Pickup Heritage F150 - 4X4 PROBLEMS by Doctor D at Doner Automotive
An intermittent or constant no 4X4 condition may be caused by a faulty mechanical shift on the fly relay. The relay, located in the auxiliary relay box #3 above the passenger air bag, may begin to fail as the contact points across the relay overheat and burn out. This is a very small relay for such a high amperage circuit and over time with consistent use of the 4X4 system, contacts overheat and may begin to intermittently fail as resistance increases. Verify no GEM codes for 4X4 system are present that would indicate other system failures. If the 4X4 system is not actively spinning the front drive-shaft, try tapping the relay while monitoring the transfer case magnetic clutch for engagement of the front dive-shaft. The relay may be accessed by removal of the upper right dash cover. The relay is located in the front upper position of the block and has WHT/LT BLU, ORG, DK GRN/LT GRN and BRN wires leading to it.
Click images below for larger view.

==========
Tip: 4X4 problems
Vehicle: 2004 Ford Pickup Heritage F150
Category/Subcategory: Transmission / Transfer Case
Title/Heading: TRANSFER CASE - GENERAL INFORMATION / Transfer Case-MSOF
Posted By: Doctor D
Shop: DONER AUTOMOTIVE
Date: 12/21/2011
2008 Chrysler Aspen - P1416 08 ASPEN 5.7 HEMI FEELS LIKE MISFIRE by greasybob at TJ's Auto and Collision Center, Inc.
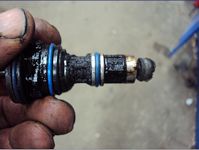
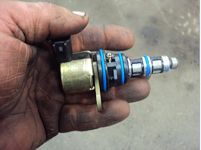
Had an 08 Chrysler Aspen with a 5.7 hemi. The complaint was for a transmission shudder ???? Test drive felt more like misfire . The vehicle would start and idle smooth then go for a drive and after the first stop the rough idle/misfire would start. What happens is the engine would go into conserve 4 cylinder mode at the first stop and shut down the four cylinders by disengaging the the lifter pins by activating the lifter solenoid, all good but when it would go back into 8 cylinder mode the no. 6 cylinder intake lifter would not reengage causing misfire. Once the malfunction occured you could shut the engine off, wait a minute or so then restart it and it would be good again til the next time you stopped and idled. This lead me to beleive the problem was a stuck solenoid and not a problem with the lifter.
Decided to remove the intake manifold and inspect the solenoid. Found it all stuffed up with sludge. Advised the customer that all the solenoids should be inspected and that means replacing them since they will break upon removal. No go, just change one and change the oil. OK. Replacing the solenoid fixed the problem. Several test drives and all is good, for now.
Click images below for larger view.

==========
Tip: P1416 08 ASPEN 5.7 HEMI FEELS LIKE MISFIRE.. THE FIX ...WITH PICTURES
Vehicle: 2008 Chrysler Aspen Limited
Category/Subcategory: Engine Performance / Testing & Diagnostics
Title/Heading: DTCS P0693 TO P2072 / P1416-CYLINDER 6 REACTIVATION CONTROL PERFORMANCE
Posted By: greasybob
Shop: TJS AUTO AND COLLISION CTR INC
Date: 12/22/2011
|